Back in The MagPi #58 we showed you our Hexome simulator, running on a mobile device and controlling a sequence. It used concentric rings of trigger positions, starting with a ring of six with each subsequent ring having six more trigger positions. Now we take that basic idea, run with it, fall over, pick up the pieces, and assemble it into a universal polyrhythmic sequencer.
This article was written by Mike Cook and appears in The MagPi #61.
The basic concepts are the same, but this project gives us nearly unlimited flexibility. Each ring generates only one note, and those notes can be changed by mapping. However, almost everything else has changed. There are up to six rings in the sequence: each ring can have a maximum of 32 trigger positions, and can be individually muted. The big change is that each ring can have its own individual sound and volume, courtesy of MIDI.
MIDI connection for your polyrhythmic sequencer
MIDI stands for Musical Interface for Digital Instruments. It is a very old standard, but still as popular as ever. MIDI is a serial interface that sends messages between musical devices, which include instruments (like a keyboard), and sound modules that generate an audio signal. Some devices can combine the two categories in one device – the most popular being sound-generating keyboards.
Messages consist of two or three bytes, and cover commands such as Note On and Note Off, as well as other controls, including volume, vibrato, echo, and pitch bend.
A MIDI connection can control 16 different channels, where a channel can range from one voice or sound to a totally separate piece of hardware. Often instruments have a switch that determines the channel they transmit on, and most will default to channel 1.
MIDI runs at the quirky baud rate of 31,250 baud. It is odd by today’s standards, but in the old days it was used because it was simple to generate. A MIDI device can have an input and an output, and, much to the surprise of younger people, an input must be connected to an output. There can also be a MIDI ‘Thru’ (‘through’ in English), which is simply the signal from an MIDI input, passed to an output, allowing one MIDI output to talk to a number of inputs in a chained fashion.
The quirky baud rate is a historic accident. At the time, you would have used a 1 MHz clock for your processor, which you simply divided by two to give 500 kHz. This was fed directly into the UART (serial chip), which required a clock signal of 16 times the baud rate, giving you 31,250 baud. While the Raspberry Pi can’t support that rate directly, it can be helped to do so. Although this was relatively simple on earlier models, the Pi 3 uses the good serial port for Bluetooth, and the second serial port is tied to the clock speed – which can be variable depending on processor demand and temperature. The simplest solution is to bypass the serial port and plug in a USB/MIDI lead. While these used to be expensive, today you can find them for less than £5.
We also chose to use a hardware MIDI sound module for this project. We used the Yamaha MU10, but there are any number of modules that could be used – many available second-hand at bargain prices. There are many other options for this project – see the ‘Taking it further’ section at the end of this article. The basic setup we used is shown in Figure 1.

Why MIDI?
So why use MIDI for this project? Other projects we have worked on involving sound generate that sound by playing samples. Those samples have to be found, recorded and put into the appropriate files. If you want to use more than a handful of different instruments, this is a lot of work. It can also result in an unsatisfactory quality of sound, because you can’t control the individual volume, and you can experience audio clipping if too many samples are played at the same time. By using MIDI, we can leave the instrument or voice generation to another piece of hardware or software.
Polyrhythmic sequencer
The original Hexome was based on a hexagonal grid of concentric circles. This gave an inner ring of six positions. Around that was a circle of 12, around that a circle of 18, and so on. This led to a rule that any ring Rn has the number of positions in Rn given by:
Rn= Rn-1 + 6
…where Rn-1 is the number of keys in the previous ring.
With this software, we can base the rings on any number, so that formula becomes:
Rn= Rn-1 + B
…where B is the base number of the innermost ring. This leads to the concept of a Triome, based on three positions on a ring – or a Quadome, Pentome, Heptome or Octome. Each of these models can be set up using this software. Additionally, any number of trigger points can be set up on a ring, up to a maximum of 32. For example, if each ring has the same number of trigger points, you have simply produced a conventional N step sequencer.
The length, or number of steps before repeating, of any particular setup is given by the highest common factor of each of the rings. This is maximised in setups where the rings contain a prime number of trigger points, as this gives a sequence length of the number of trigger points in each ring multiplied together. If you start at two triggers for the smallest ring, this gives a staggering 30,030 steps before a repeat. Starting with a base of three you get even more, at 255,255. At these sequence lengths, the result is indistinguishable from random sounds.
Implementation
To write the code, we are going to use the Processing language. If you haven’t already, install Processing by opening a Terminal window and typing:
curl https://processing.org/download/install-arm.sh | sudo sh
You also need to install two libraries. From the Sketch menu, go to the import library entry and choose Add Library, then search for and install controlP5. This deals with the variable controls. Then repeat this and install the themidibus library. This is the library that will generate and send the MIDI messages.
As the code is rather long, you can download it from here. It is entirely operated from the keyboard or mouse attached to the Raspberry Pi.
The number of rings is limited to six in this implementation, simply because the resulting 980×720 pixel window is all that will fit on a standard HD screen. If you want a seven-ring sequencer, you would need a window measuring at least 1100×860 pixels. Each ring is limited to a maximum of 32 trigger points, again due to the physical resolution of the screen. This is despite using the trick of changing the ring width depending on the number of trigger points.
The Code
The code is written in three sections, or tabs: these are Poly, Controls, and Note_Map. In the Poly tab, the line at the start:
MidiBus.list()
…lists all the MIDI devices that have been recognised by the computer, both as input and output devices. We are only interested in output devices, and it is likely that you will only have one such device plugged in. If so, the line:
MidiBus(this, 0, 1)
…which selects the MIDI device to use, will not need to be changed.
The controls
Figure 2 shows the screen, with an explanation of the controls and what they do. In order to fit round the circles, and to minimise the window width required, the controls are scattered around the outermost circle. Most of the controls need repeating for each ring, including the ring length and mute controls. Others apply to the whole instrument, including the speed control, along with the Stop/Start, Reset and Clear commands.
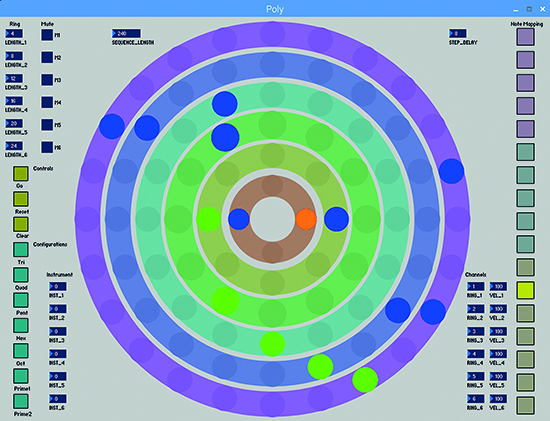
The configuration controls give you some preset rings and trigger position numbers. These can be modified by the ring length controls, but it is a convenient place to start. The instrument controls determine the voices for each ring. On startup, this is set to 0, which is a Grand Piano. For a list of which instruments correspond to each number, see the implementation sheet for your MIDI sound module.
On the lower right-hand side of the screen is the MIDI channel for each ring. These can be set to the same channel to play all the notes with the same voice. Similarly, the Velocity number determines how hard an instrument is ‘struck’. You might like to think of this as a volume control, which in a way it is – but a good sound module will also subtly change the timbre of the sound as the velocity increases.
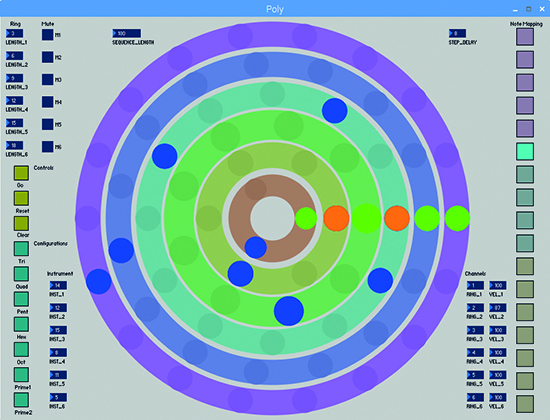
The note mapping is controlled by the buttons running down the right-hand side of the window. This controls which notes are generated on each ring, as defined in the NoteMap code tab. The top five are arranged in thirds, ascending; whereas the next five are in a pentatonic scale. It is a good idea not to change between these in a single piece, as the resulting key change can be jarring. The lower seven mappings are simple single-note shifts in the key of C major. These settings can easily be changed by altering the code in the NoteMap code tab. Figure 3 shows three different setups for the program.


MIDI channel 9
There is something special about MIDI channel 9. When you use this channel, for each note number you don’t get a change in note pitch, but a different percussive instrument, including cymbals, drums, cowbells, blocks, and whistles. With the same mapping as the pitched notes, it can be pot luck as to which instrument ends up here.
It is possible that as you change some parameters on the fly, you can be left with a hanging note. This is a note where the sound module has received a Note On message, but no corresponding Note Off message. If you get a hanging note and want to reset it, click the Reset control. This sends Note Off messages to all possible notes on all possible channels, a process which takes less than two seconds.
Taking it further
You can extend any program. Despite its flexibility, this one is no exception. The most useful change you could make is to include the ability to save and load the patterns and controls you have created. It is just a matter of saving the appropriate arrays, and restoring them when you load the program. You also might like to have a special set of mapping that kicks in when the percussion channel, channel 9, is selected. You might want to use a soft synth as your sound generator – this could be on another computer, another Pi, or on the same Pi you are using to run the software. The fluidsynth and qsynth combination is popular on the Pi, but there are several MIDI-capable synthesizers out there. You could even investigate routing the output of this sequencer into Sonic Pi.