
Sure, WiFi is all well and good, but is it the only option for wireless communication on the Raspberry Pi? What if there isn’t a network available or you need a longer range? 433MHz radio is where you want to be. In this tutorial we’ll add this capability to a pair of Pi boards and show how to send wireless messages from one to the other with no WiFi network. Then, we’ll increase the range with a touch of science and start talking to RF-based switchable main sockets. Have Pi-controlled sockets all around the house!
This tutorial was written by PJ Evans and first appeared in The MagPi magazine issue #75. Click here to download your free digital copy of The MagPi magazine.
You'll need
Prepare your Raspberry Pi boards
To demonstrate sending messages using 433MHz, it makes sense to use two Raspberry Pi boards so we can have a conversation. None of what we’re doing here requires much processing power, so any Pi will do, even original Model As or Bs. Depending on what you’re comfortable with, install either full Raspbian Stretch, or – as we’re doing here – Raspbian Lite, as everything will be run from the command line. If you haven’t got access to multiple monitors and keyboards, consider using SSH to access each Pi with two windows on your main computer. That way you can see everything taking place.
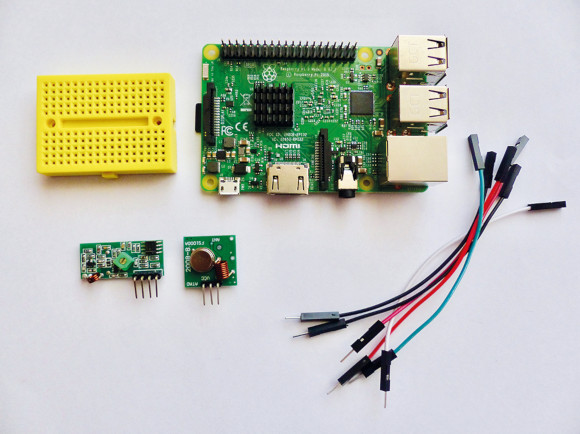
Meet the transceivers
Each kit comes with two circuit boards. The longer of the two boards is the receiver, sporting four pins. Before wiring up, check the labelling of these pins very carefully as they do sometimes vary. Regardless of position, there will be 5 V power in (labelled VCC), ground (GND), and two ‘DATA’ lines which transmit the received signals. These are identical so you can use either.
The smaller transmitter has three lines, which again can vary in position based on the manufacturer. Just like the receiver, you have VCC for power, GND for ground, and this time, a single data line.
Wire-up the breadboard
We’re using a tiny breadboard, but any size will work. In fact, a larger board with power and ground rails might be a bit tidier. Carefully insert a receiver and transmitter in each breadboard alongside each other. We want the two breadboards opposite so that the transmitter of Pi #1 (which we’re calling ‘Alice’) is pointing directly at the receiver of Pi #2 (‘Bob’) and vice versa.
Connect six jumper leads to each breadboard, one on the rail for each pin of the transceiver pair. It doesn’t matter which ‘DATA’ line you use on the receiver.
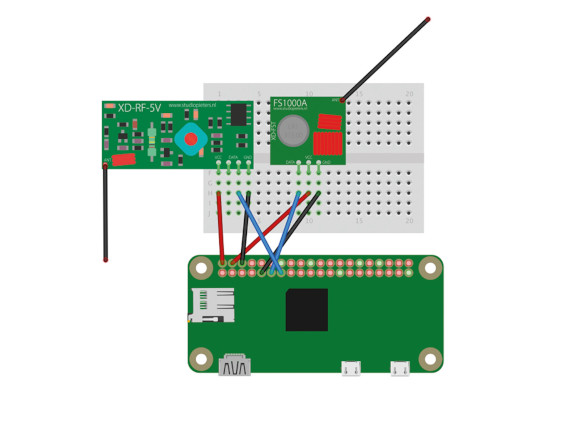
Connect to the Raspberry Pi boards
Connect each Raspberry Pi to its six jumper leads. Luckily, this project doesn’t require any additional components, so you can wire directly. Both the receiver and transmitter run at 5 V, so connect each VCC jumper lead to physical pins 2 and 4 of the GPIO (the top two right-hand pins when pin 1 is top-left). Next, connect the GND leads to pins 6 and 9. Although your radio is now powered, it’s not much use if it can’t send and receive data, so connect the transmitter’s DATA to GPIO 17 and the receiver’s DATA to GPIO 27 (pins 11 and 13).

Test receive
Before we can do anything with our newly installed radio, we need some software. Open up a Terminal and issue the following commands:
cd
sudo apt install python3-pip git
pip3 install rpi-rf
git clone https://github.com/mrpjevans/rfchat.git
You now have everything installed to test your hardware. Pick your favourite of the two Raspberry Pi boards and enter the following:
cd ~/rfchat
python3 receive.py
Now hold the remote control from the RF kit very close to the receiver and press its buttons. See numbers appear? Great. If not, review your wiring. Press CTRL+C to quit and repeat on the other Pi.
Test send
Position the Raspberry Pi boards so the two breadboards are within a centimetre of each other, with Alice’s transmitter pointing at Bob’s receiver and likewise the other way around. On Alice, start the receive script just as we did in the previous step. On Bob, enter the following in the Terminal:
cd ~/rfchat
python3 send.py 1234
All being well, ‘1234’ should be displayed repeatedly on Alice’s screen. There’s no error correction, so it’s normal to see missing or corrupt characters. If it doesn’t look quite right, try again. Once you’re happy, reverse the test to confirm Bob’s receiver is also working.
Let’s have a chat
Our two Raspberry Pi boards can now communicate wirelessly without WiFi. To demonstrate what’s possible, take a look at the rfchat.py script. This code uses threading (code‑speak for doing multiple things at once) to monitor the keyboard and receiver for data. We convert incoming and outgoing data to numbers (ASCII) and back. The result is a live chat interface. You can now send and receive messages. To start:
cd ~/rfchat
python3 rfchat.py
Now slowly type on either Pi and the message will appear on the other. In fact, your local output is your receiver picking up your own transmitter!
Increasing range with science
The reason for the radio’s poor range is the tiny antennas, but this can be fixed. The antenna’s length needs to be a harmonic of the wavelength, which is calculated by dividing the speed of light by the frequency (299 792 458 m/s divided by 433 000 000). You can keep dividing the result of 692.36 mm by 2 until you get a sensible length. A 173 mm antenna is long enough to give an impressive range, normally covering a whole house. Solder 173 mm wires to all four ‘ANT’ solder points on the PCBs. Your rfchat should now work over long distances.
Socket to me
There are many household devices that use 433MHz to send control codes. Among the most popular are remote-control mains sockets, often used to switch lights. These commonly use 433MHz and protocols that rpi-rf can understand.
cd ~/rfchat
python3 receive.py
Press buttons on the remote control. You’re likely to see a list of numbers, repeating for error correction, that change with each button. Make a note of these and then send them out as follows:
python3 send.py [number]
You should hear a reassuring ‘click’ from the relay of the socket. Try switching it on or off.
Make it your own
These 433MHz units add a range of possibilities to your Raspberry Pi projects at a very low cost. Not just home automation projects with controllable sockets, but also providing radio communication where WiFi isn’t practical, such as high-altitude ballooning or unusually positioned sensors like flood monitors. IoT devices can use radio to deliver and receive any information. Now you can control sockets from your Raspberry Pi, you can link these up to any kind of event you can imagine. How about detecting your car coming home using a Pi Camera Module and number-plate recognition, then switching on the house lights?
import sys
import tty
import termios
import threading
import time
from rpi_rf import RFDevice

# Elegant shutdown
def exithandler():
    termios.tcsetattr(sys.stdin, termios.TCSADRAIN, old_settings)
    try:
        rx.cleanup()
        tx.cleanup()
    except:
        pass
    sys.exit(0)

# Activate our transmitter and received
tx = RFDevice(17)
tx.enable_tx()
rx = RFDevice(27)
rx.enable_rx()

# Receiving loop
def rec(rx):

    print(“Receiving”)

    lastTime = None
    while True:
        currentTime = rx.rx_code_timestamp
        if (
            currentTime != lastTime and
            (lastTime is None or currentTime - lastTime > 350000)
        ):
            lastTime = rx.rx_code_timestamp
            try:
                if (rx.rx_code == 13):
                    # Enter/Return Pressed
                    sys.stdout.write(‘\r\n’)
                else:
                    sys.stdout.write(chr
(rx.rx_code))
                sys.stdout.flush()
            except:
                pass

        time.sleep(0.01)

# Start receiving thread
t = threading.Thread(target=rec,
args=(rx,), daemon=True)
t.start()

print(“Ready to transmit”)

# Remember how the shell was set up so we can reset on exit
old_settings = termios.tcgetattr(sys.stdin)
tty.setraw(sys.stdin)

while True:

    # Wait for a keypress
    char = sys.stdin.read(1)

    # If CTRL-C, shutdown
    if ord(char) == 3:
        exithandler()
    else:
        # Transmit character
        tx.tx_code(ord(char))

    time.sleep(0.01)


